Podešavanja BIOS-a
NAPOMENA: Ekrani za BIOS u ovom poglavlju služe samo za referencu.
Postojeće upakovane aplikacije razlikuju se po modelima i teritorijama.
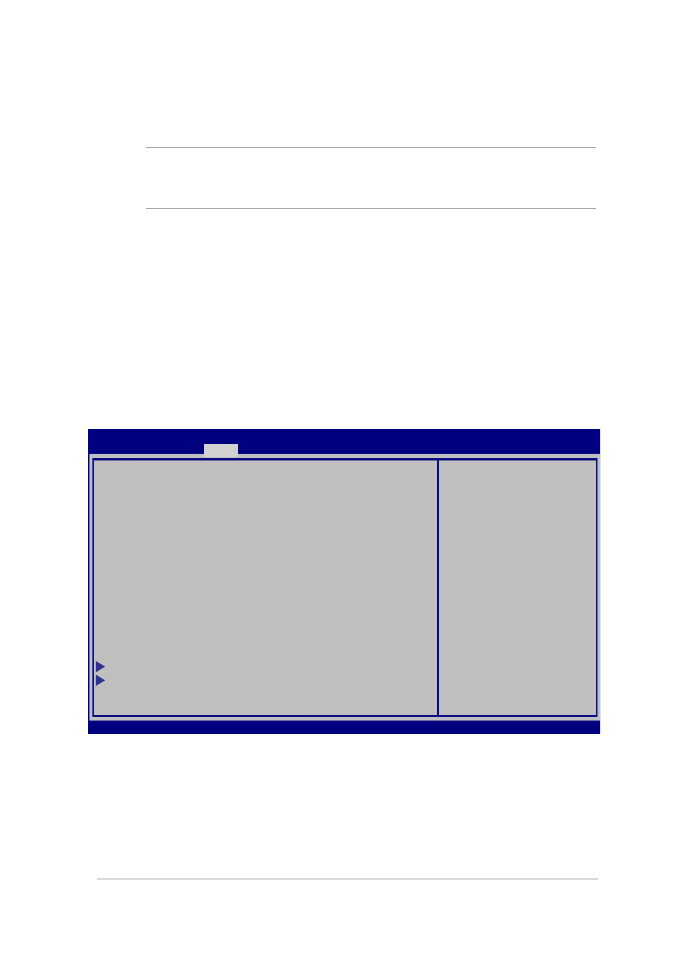
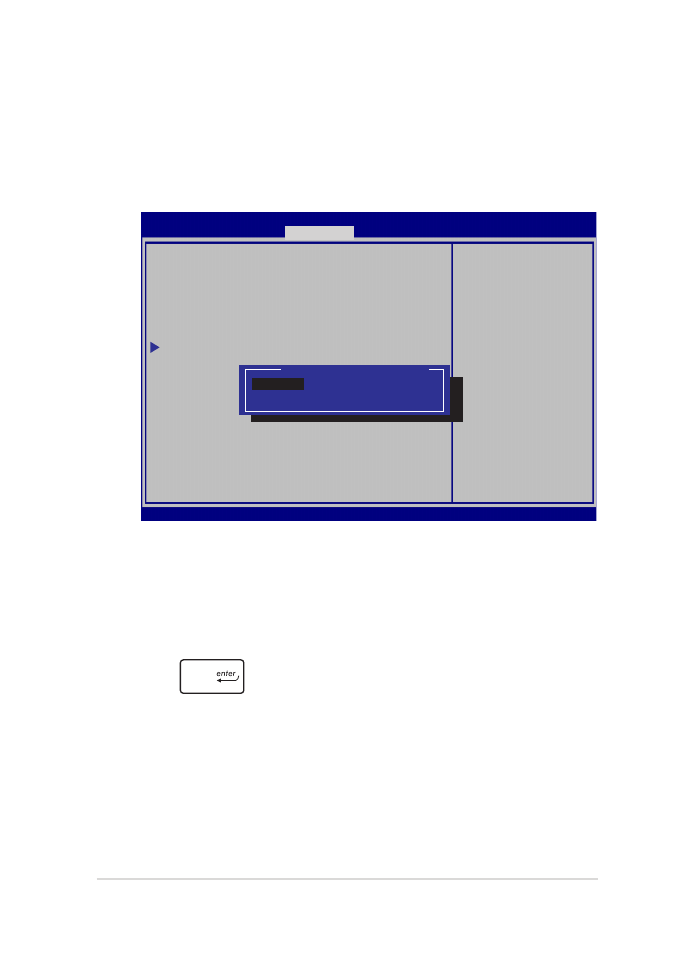
Boot (Podizanje sistema)
Ovaj meni vam omogućava da podesite prioritete opcija za podizanje
sistema. Prilikom podešavanja prioriteta za podizanje sistema, vodite se
sledećom procedurom.
1.
Na ekranu Boot (pokretanje), odaberite Boot Option #1 (Opciju
za pokretanje #1).
→←
: Select Screen
↑↓
: Select Item
Enter: Select
+/— : Change Opt.
F1 : General Help
F9 : Optimized Defaults
F10 : Save & Exit
ESC : Exit
Boot Configuration
Fast Boot [Enabled]
Launch CSM [Disabled]
Driver Option Priorities
Boot Option Priorities
Boot Option #1 [Windows Boot Manager]
Add New Boot Option
Delete Boot Option
Sets the system boot
order
Aptio Setup Utility - Copyright (C) 2012 American Megatrends, Inc.
Main Advanced
Boot
Security Save & Exit
Version 2.15.1226. Copyright (C) 2012 American Megatrends, Inc.
84
E-priručnik za notebook računar
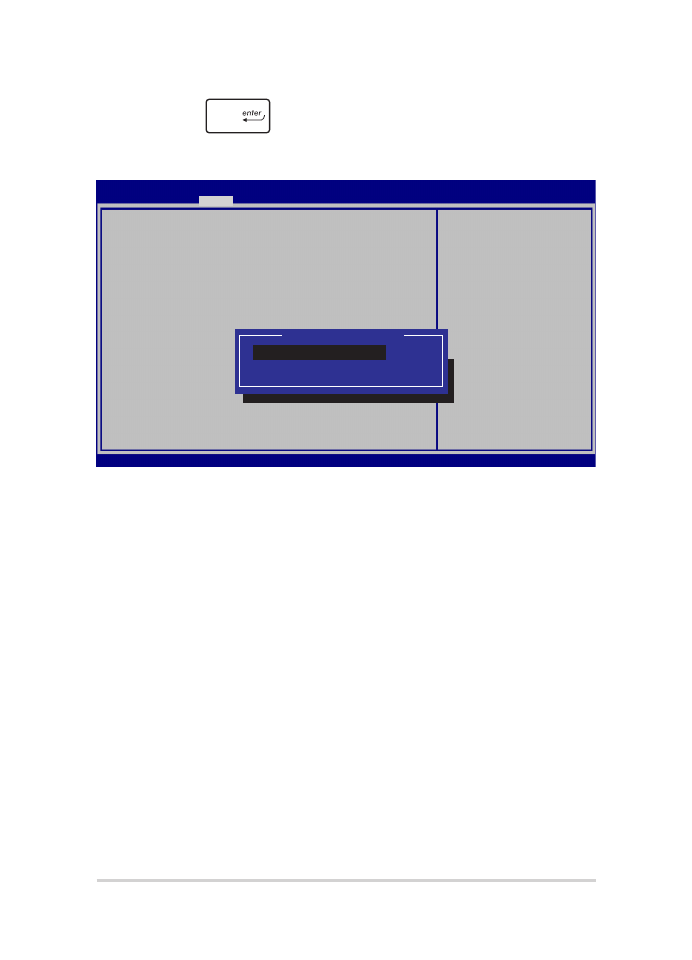
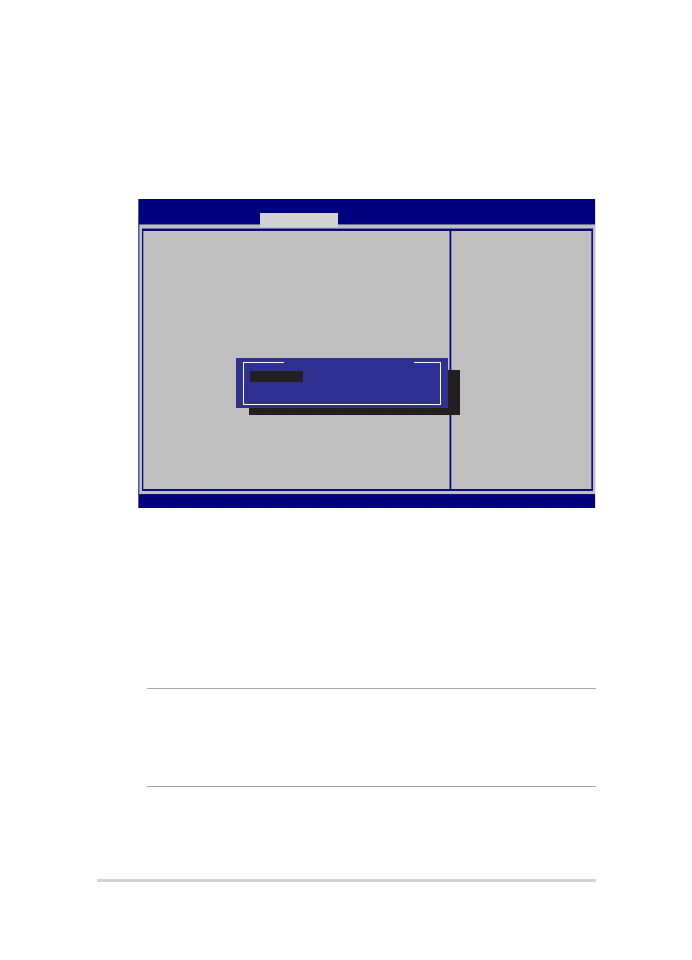
2. Pritisnite
i odaberite uređaj kao Boot Option #1 (Opciju
za pokretanje #1).
→←
: Select Screen
↑↓
: Select Item
Enter: Select
+/— : Change Opt.
F1 : General Help
F9 : Optimized Defaults
F10 : Save & Exit
ESC : Exit
Sets the system
boot order
Aptio Setup Utility - Copyright (C) 2012 American Megatrends, Inc.
Main Advanced
Boot
Security Save & Exit
Version 2.15.1226. Copyright (C) 2012 American Megatrends, Inc.
Boot Configuration
Fast Boot [Enabled]
Launch CSM [Disabled]
Driver Option Priorities
Boot Option Priorities
Boot Option #1 [Windows Boot Manager]
Add New Boot Option
Delete Boot Option
Boot Option #1
Windows Boot Manager
Disabled
E-priručnik za notebook računar
85
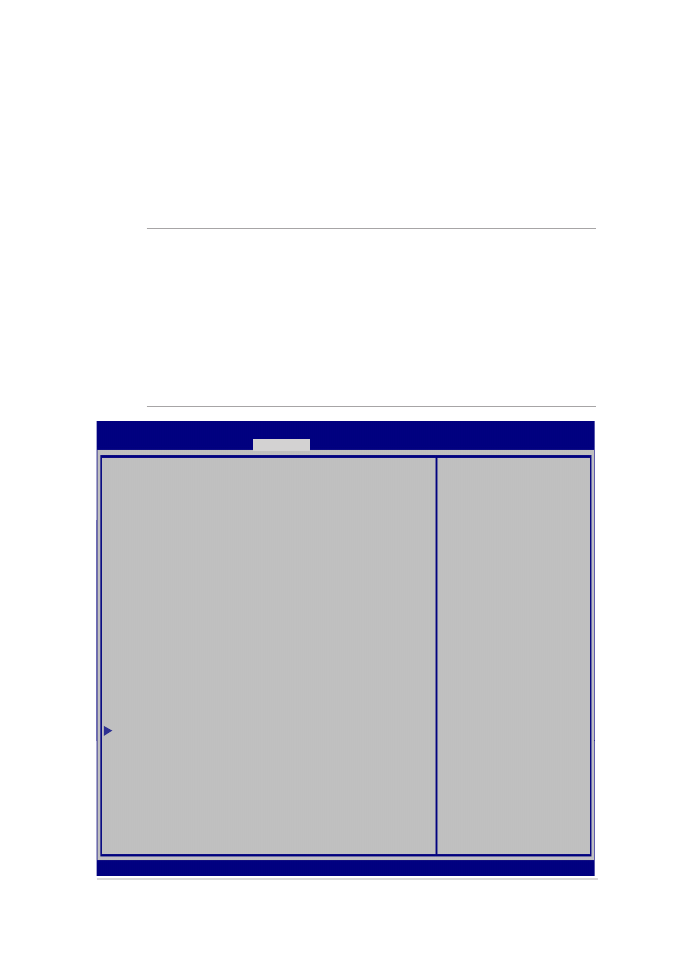
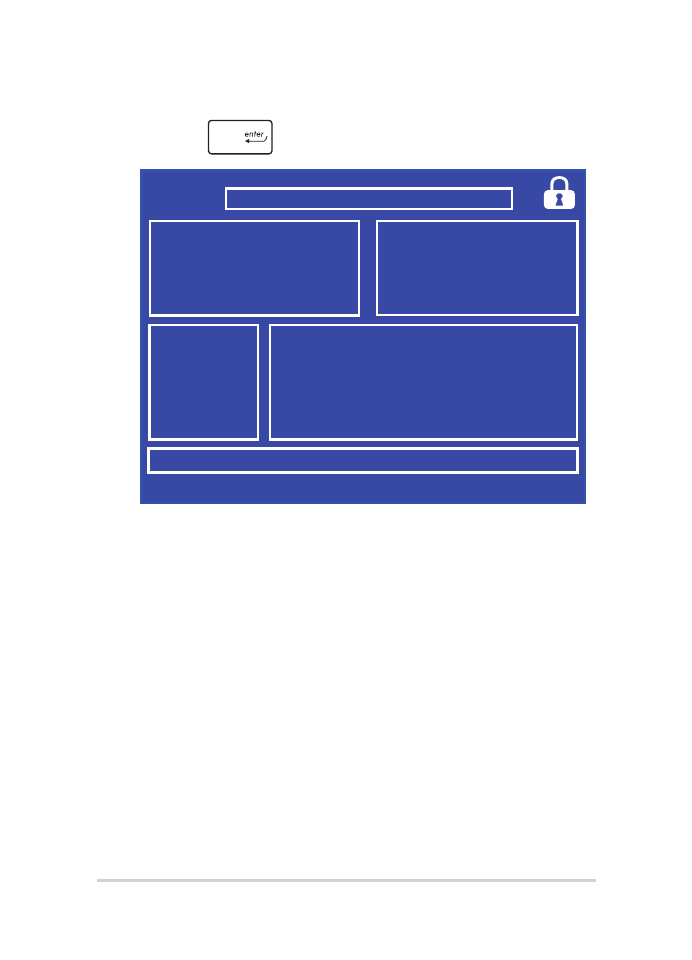
Security (Bezbednost)
Ovaj meni vam omogućava da podesite administratorsku i korisničku
lozinku za notebook računar. Takođe vam omogućava da kontrolišete
pristup disk jedinici notebook računara, ulazno-izlaznom (I/O) interfejsu
i USB interfejsu.
NAPOMENA:
•
Ako podesite opciju User Password (Korisnička lozinka), od vas će
biti zatraženo da unesete lozinku pre pristupa operativnom sistemu
notebook računara.
•
Ako podesite opciju Administrator Password (Administratorska
lozinka), od vas će biti zatraženo da unesete lozinku pre pristupa
BIOS-u.
Password Description
If ONLY the Administrator’s password is set,
then this only limits access to Setup and is
only asked for when entering Setup. If ONLY
the user’s password is set, then this is a
power on password and must be entered to boot
or enter Setup. In Setup, the User will have
Administrator rights.
Administrator Password Status NOT INSTALLED
User Password Status NOT INSTALLED
Administrator Password
User Password
HDD Password Status : NOT INSTALLED
Set Master Password
Set User Password
I/O Interface Security
System Mode state User
Secure Boot state Enabled
Secure Boot Control [Enabled]
Key Management
Set Administrator
Password. The
password length
must be in the
following range:
Minimum length 3
Maximum length 20
Aptio Setup Utility - Copyright (C) 2012 American Megatrends, Inc.
Main Advanced Boot
Security
Save & Exit
→←
: Select Screen
↑↓
: Select Item
Enter: Select
+/— : Change Opt.
F1 : General Help
F9 : Optimized Defaults
F10 : Save & Exit
ESC : Exit
Version 2.15.1226. Copyright (C) 2012 American Megatrends, Inc.
86
E-priručnik za notebook računar
Da bi obrisali lozinku:
1.
Na ekranu Security (Bezbednost), odaberite Setup
Administrator Password (lozinku za administratora
podešavanja) ili User Password (korisničku lozinku).
2.
Unesite trenutnu lozinku i pritisnite
.
3.
Ostavite polje Create New Password (kreiraj novu lozinku)
prazno i pritisnite
.
4. Izaberite
Yes (Da) u dijalogu za potvrdu, a zatim pritisnite
.
Da podesite lozinku:
1.
Na ekranu Security (Bezbednost), odaberite Setup
Administrator Password (lozinku za administratora
podešavanja) ili User Password (korisničku lozinku).
2.
Ukucajte lozinku i pritisnite
.
3.
Ukucajte lozinku ponovo i pritisnite
.
E-priručnik za notebook računar
87
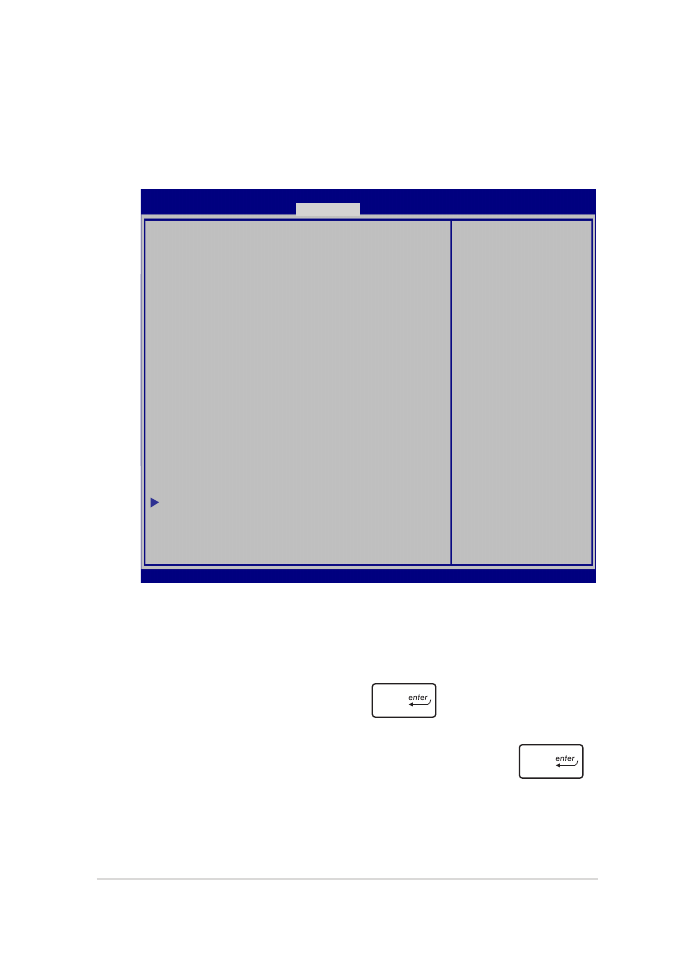
I/O Interface Security (Bezbednost ulazno-izlaznog
interfejsa)
U okviru menija Bezbednost, možete da pristupite opciji
Bezbednost ulazno-izlaznog interfejsa da biste zaključali ili
otključali određene funkcije interfejsa notebook računara.
Da zaključate I/O interfejs:
1.
Na ekranu bezbednost, odaberite
Bezbednost I/O
interfejsa
.
2.
Odaberite interfejs koji biste želeli da zaključate i kliknite na
.
3. Izaberite
Lock (Zaključaj).
I/O Interface Security
LAN Network Interface [UnLock]
Wireless Network Interface [UnLock]
HD AUDIO Interface [UnLock]
USB Interface Security
If Locked, LAN
controller will
be disabled.
Aptio Setup Utility - Copyright (C) 2012 American Megatrends, Inc.
Security
→←
: Select
Screen
↑↓
: Select Item
Enter: Select
+/— : Change Opt.
F1 : General Help
F9 : Optimized
Defaults
F10 : Save & Exit
ESC : Exit
Version 2.15.1226. Copyright (C) 2012 American Megatrends, Inc.
LAN Network Interface
Lock
UnLock
88
E-priručnik za notebook računar
Bezbednost USB interfejsa
Kroz meni Bezbednost ulazno-izlaznog interfejsa takođe možete
da pristupite opciji Bezbednost USB interfejsa da biste zaključali
ili otključali portove i uređaje.
Da zaključate USB interfejs:
1.
Na ekranu bezbednost, odaberite Bezbednost I/O
interfejsa > Bezbednost USB interfejsa.
2.
Odaberite interfejs koji biste želeli da zaključate i kliknite na
zaključaj
.
NAPOMENA: Postavljanje opcije USB Interface (USB interfejs) na Lock
(Zaključaj) takođe zaključava i sakriva opciju External Ports (Eksterni
portovi) i druge uređaje u okviru menija USB Interface Security
(Bezbednost USB interfejsa).
Version 2.15.1226. Copyright (C) 2012 American Megatrends, Inc.
USB Interface Security
USB Interface [UnLock]
External Ports [UnLock]
CMOS Camera [UnLock]
Card Reader [UnLock]
If Locked, all
USB device will
be disabled
Aptio Setup Utility - Copyright (C) 2012 American Megatrends, Inc.
Security
→←
: Select Screen
↑↓
: Select Item
Enter: Select
+/— : Change Opt.
F1 : General Help
F9 : Optimized
Defaults
F10 : Save & Exit
ESC : Exit
USB Interface
Lock
UnLock
E-priručnik za notebook računar
89
Set Master Password (Podešavanje glavne lozinke)
U meniju Bezbednost, pomoću opcije Set Master Password
(Podešavanje glavne lozinke) možete da podesite da pristup
disk jedinici bude zaštićen lozinkom.
Da podesite HDD lozinku
1.
Na ekranu bezbednost, kliknite na podesi master lozinku.
2.
Ukucajte lozinku i pritisnite
.
3.
Ukucajte ponovo da potvrdite lozinku i pritisnite
.
4.
Kliknite na podesi korisničku lozinku i ponovite prethodne
korake da podesite korisničku lozinku.
Aptio Setup Utility - Copyright (C) 2011 American Megatrends, Inc.
Set HDD Master
Password.
***Advisable to
Power Cycle System
after Setting Hard
Disk Passwords***
Aptio Setup Utility - Copyright (C) 2012 American Megatrends, Inc.
Main Advanced Boot
Security
Save & Exit
→←
: Select
Screen
↑↓
: Select Item
Enter: Select
+/— : Change Opt.
F1 : General Help
F9 : Optimized
Defaults
F10 : Save & Exit
ESC : Exit
Version 2.15.1226. Copyright (C) 2012 American Megatrends, Inc.
Password Description
If ONLY the Administrator’s password is
set,then this only limits access to Setup
and is only asked for when entering Setup.
If ONLY the user’s password is set, then
this is a power on password and must be
entered to boot or enter Setup. In Setup,
the User will have Administrator rights.
Administrator Password Status NOT INSTALLED
User Password Status NOT INSTALLED
Administrator Password
User Password
HDD Password Status : NOT INSTALLED
Set Master Password
Set User Password
I/O Interface Security

90
E-priručnik za notebook računar
Save & Exit (Sačuvaj i izađi)
Da biste zadržali obavljena podešavanja, izaberite opciju Save Changes
and Exit (Sačuvaj promene i izađi) pre napuštanja BIOS-a.
Aptio Setup Utility - Copyright (C) 2012 American Megatrends, Inc.
Main Advanced Boot Security
Save & Exit
→←
: Select Screen
↑↓
: Select Item
Enter: Select
+/— : Change Opt.
F1 : General Help
F9 : Optimized Defaults
F10 : Save & Exit
ESC : Exit
Version 2.15.1226. Copyright (C) 2012 American Megatrends, Inc.
Save Changes and Exit
Discard Changes and Exit
Save Options
Save Changes
Discard Changes
Restore Defaults
Boot Override
Windows Boot Manager
Launch EFI Shell from filesystem device
Exit system setup
after saving the
changes.
E-priručnik za notebook računar
91
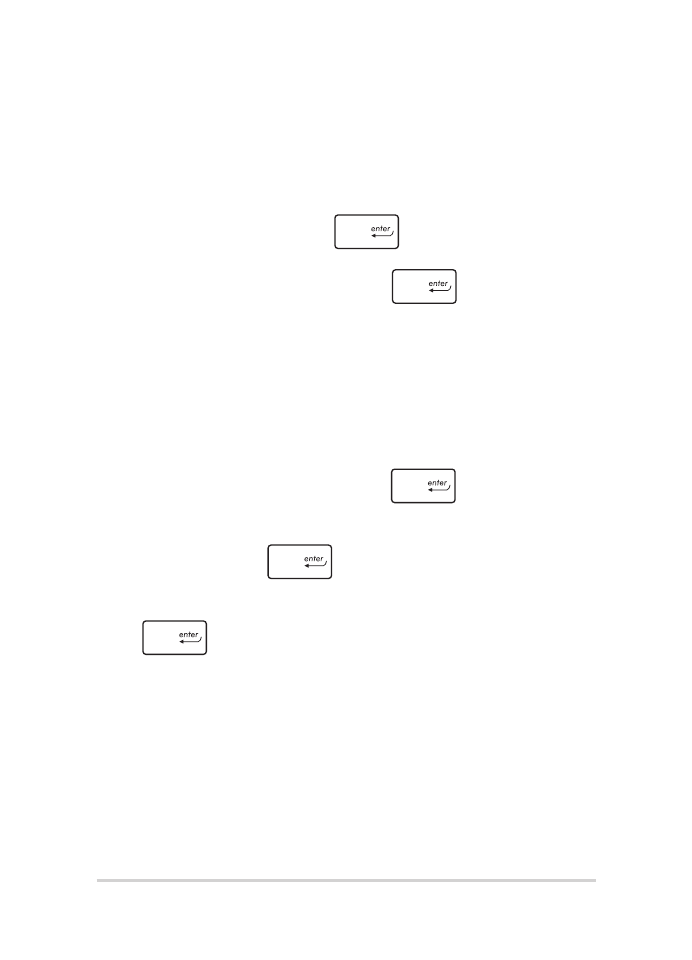
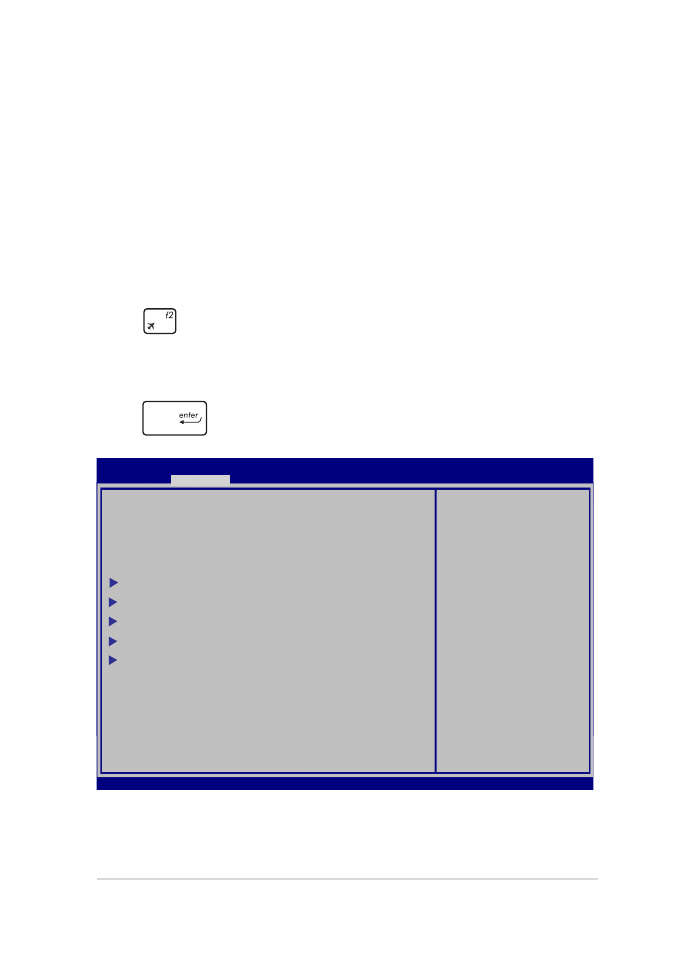
Ažuriranje BIOS-a:
1.
Proverite tačan model notebook računara i potom sa web sajta
kompanije ASUS preuzmite najnoviju BIOS datoteku za vaš
model.
2.
Sačuvajte kopiju preuzete BIOS datoteke na jedinicu fleš diska.
3.
Povežite jedinicu fleš diska sa notebook računarom.
4.
Ponovo pokrenite notebook računar i zatim pritisnite tokom
POST testa.
5.
Iz programa BIOS Setup, kliknite na Advanced (Napredno) >
Start Easy Flash (Pokreni Easy Flash), a zatim pritisnite taster
.
Aptio Setup Utility - Copyright (C) 2011 American Megatrends, Inc.
Start Easy Flash
Internal Pointing Device [Enabled]
Wake on Lid Open [Enabled]
Power Off Energy Saving [Enabled]
SATA Configuration
Graphics Configuration
Intel (R) Anti-Theft Technology Corporation
USB Configuration
Network Stack
Press Enter to run
the utility to
select and update
BIOS.
Aptio Setup Utility - Copyright (C) 2012 American Megatrends, Inc.
Main
Advanced
Boot Security Save & Exit
→←
: Select Screen
↑↓
: Select Item
Enter: Select
+/— : Change Opt.
F1 : General Help
F9 : Optimized Defaults
F10 : Save & Exit
ESC : Exit
Version 2.15.1226. Copyright (C) 2012 American Megatrends, Inc.
92
E-priručnik za notebook računar
6.
Pronađite preuzetu BIOS datoteku na jedinici fleš diska i potom
pritisnite
.
7.
Nakon ažuriranja BIOS-a, kliknite na Exit (Zatvori) > Restore
Defaults (Vrati na podrazumevane vrednosti) kako biste vratili
sistem na podrazumevana podešavanja.
FSO
FS1
FS2
FS3
FS4
0 EFI
<DIR>
ASUSTek Easy Flash Utility
[←→]: Switch [↑↓]: Choose [q]: Exit [Enter]: Enter/Execute
Current BIOS
Platform: G751
Version: 101
Build Date: Oct 26 2012
Build Time: 11:51:05
New BIOS
Platform: Unknown
Version: Unknown
Build Date: Unknown
Build Time: Unknown
FLASH TYPE:
MXIC 25L Series

E-priručnik za notebook računar
93